Roy's Ecotec Manx I build completion
- joescoolcustoms
- Posts: 286
- Joined: Mon Jun 03, 2013 5:00 am
- Location: Saint Albans, WV
Re: Roy's Ecotec Manx I build completion
Now that the fabrication work is completed that involves the body being on, the body work and paint can start. I continued with stripping the body to the original Yuma Yellow gel coat. Best way to restore a old car/buggy. That way you can see exactly what you have, previous repairs, and some times a surprise will pop up.
Upon stripping the spare tire well, I uncovered a trace of where the small piece of tape was used to cover over the air release hole in the mold. Pretty cool!
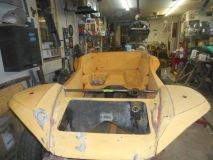
Now the the body is "clean", the needed fiberglass repairs can be performed. I like to back every hole that is over 1/8 inch diameter. To do this, the area on the outside of the tub needs to be cleaned and fresh glass opened up so the backing with fiberglass mat will properly bond. I initially counted 114 holes, turned out to be 132 total holes in the body and another 34 in the hood to be filled/repaired.
Makes it a little easier with the body flipped up side down.
I cut and lay out all the pieces needed to repair each area so they are ready once the resin is mixed. It also keeps "sticky" fingers from ruining scissors with resin goo.
A small section of the mounting lip needed repaired too.
And all areas glassed in. Once the glass sets up well for several hours, I come back with a polishing sanding disc and dress any high points on the repairs. This takes away any "stabbing" spike points to catch and injure your hands later when working on the buggy. Something I learned the hard way.
To keep from making a mess on the inside of the body, I tape each hole so the resin does not run in on the clean surface and cause problems later with trying to remove newly set resin from a freshly sanded area.
Now that all the holes have been backed, the exposed "pretty" side gets ground with a carbide burr in a drill to open up fresh glass. Then a mixture of Cabosil, (sometimes referred to as Fumed Silica) and resin with proper ratio of hardner mixed in is spread like body filler into the pretty side to fill the holes. The Cabosil/fumed silica is micro ground glass, so it is a mixture of glass and resin, just like what the body is made of.
After several sanding and re-filling to get smooth, the entire body is hand sanded to clean the surface. The edges that were not sanded with a DA sander, was hand sanded to ensure to maintain the original contour of the edges and curves of the body. Then 1/2 gallon of Slick Sand was applied. Slick Sand is Polyester based and the same MEPK hardner is used in it just like resin. This gives a Polyester top coat over a Polyester based body keeping everything the same for temperature expansion and contraction ratios and help prevent future showing of body work.
Next comes the hours of block sanding to get the body absolutely straight.
Upon stripping the spare tire well, I uncovered a trace of where the small piece of tape was used to cover over the air release hole in the mold. Pretty cool!
Now the the body is "clean", the needed fiberglass repairs can be performed. I like to back every hole that is over 1/8 inch diameter. To do this, the area on the outside of the tub needs to be cleaned and fresh glass opened up so the backing with fiberglass mat will properly bond. I initially counted 114 holes, turned out to be 132 total holes in the body and another 34 in the hood to be filled/repaired.
Makes it a little easier with the body flipped up side down.
I cut and lay out all the pieces needed to repair each area so they are ready once the resin is mixed. It also keeps "sticky" fingers from ruining scissors with resin goo.
A small section of the mounting lip needed repaired too.
And all areas glassed in. Once the glass sets up well for several hours, I come back with a polishing sanding disc and dress any high points on the repairs. This takes away any "stabbing" spike points to catch and injure your hands later when working on the buggy. Something I learned the hard way.
To keep from making a mess on the inside of the body, I tape each hole so the resin does not run in on the clean surface and cause problems later with trying to remove newly set resin from a freshly sanded area.
Now that all the holes have been backed, the exposed "pretty" side gets ground with a carbide burr in a drill to open up fresh glass. Then a mixture of Cabosil, (sometimes referred to as Fumed Silica) and resin with proper ratio of hardner mixed in is spread like body filler into the pretty side to fill the holes. The Cabosil/fumed silica is micro ground glass, so it is a mixture of glass and resin, just like what the body is made of.
After several sanding and re-filling to get smooth, the entire body is hand sanded to clean the surface. The edges that were not sanded with a DA sander, was hand sanded to ensure to maintain the original contour of the edges and curves of the body. Then 1/2 gallon of Slick Sand was applied. Slick Sand is Polyester based and the same MEPK hardner is used in it just like resin. This gives a Polyester top coat over a Polyester based body keeping everything the same for temperature expansion and contraction ratios and help prevent future showing of body work.
Next comes the hours of block sanding to get the body absolutely straight.
Re: Roy's Ecotec Manx I build completion
Hmm... Somebody's been too busy working and picking up the next project to post updates....
(Loretta) Manx # M2940D910E on customized 1970 chassis that has been "Wheelerized" by Joescoolcustoms
(Scarlett) Manx Resorter #12 (R0012B931S) on 1969 chassis.
(Gunther) Manx 2 # A0202A035E
Tow'dster # TF530G913S
Original Home built buggy that I learned to drive in back in 1995 (the one that started my passion).
Club Member # 4436
Loretta: http://www.manxclub.com/forum/viewtopic ... t=3365Manx" onclick="window.open(this.href);return false;
- joescoolcustoms
- Posts: 286
- Joined: Mon Jun 03, 2013 5:00 am
- Location: Saint Albans, WV
Re: Roy's Ecotec Manx I build completion
abgiles wrote:Hmm... Somebody's been too busy working and picking up the next project to post updates....
Gag, gag, choke cough cough.
I smell a burnt pot calling out the kettle.
Re: Roy's Ecotec Manx I build completion
Guilty as charged! Ok, now I've started updating. I've shown you mine, you show me yours type of thing...joescoolcustoms wrote:abgiles wrote:Hmm... Somebody's been too busy working and picking up the next project to post updates....
Gag, gag, choke cough cough.
I smell a burnt pot calling out the kettle.
(Loretta) Manx # M2940D910E on customized 1970 chassis that has been "Wheelerized" by Joescoolcustoms
(Scarlett) Manx Resorter #12 (R0012B931S) on 1969 chassis.
(Gunther) Manx 2 # A0202A035E
Tow'dster # TF530G913S
Original Home built buggy that I learned to drive in back in 1995 (the one that started my passion).
Club Member # 4436
Loretta: http://www.manxclub.com/forum/viewtopic ... t=3365Manx" onclick="window.open(this.href);return false;
(Scarlett) Manx Resorter #12 (R0012B931S) on 1969 chassis.
(Gunther) Manx 2 # A0202A035E
Tow'dster # TF530G913S
Original Home built buggy that I learned to drive in back in 1995 (the one that started my passion).
Club Member # 4436
Loretta: http://www.manxclub.com/forum/viewtopic ... t=3365Manx" onclick="window.open(this.href);return false;
- joescoolcustoms
- Posts: 286
- Joined: Mon Jun 03, 2013 5:00 am
- Location: Saint Albans, WV
Re: Roy's Ecotec Manx I build completion
Shamed by a girl.
So, the topic at hand is sand. Sand, sand, sand, sand. Not the OBX Beach sand either, but the kind that gives one the warm, knowing you did something nice, hot feeling warmth you get in your wrists, elbows, and shoulders. Good old block sanding.
Now that the body work is knocked out in rough fashion, is is time to smooth it out. About 1/3 gallon of Polyester Slick Sand is sprayed on, sanded off, another 1/3 gallon sprayed on, and sanded off, then another 1/3 gallon sprayed on and sanded off. Sounds like corporal punishment. But, what happens is the body starts to take a very, very straight shape.
Being lazy, I have tried every mechanical means to get this done easier and quicker, but in 30+ years, I have found nothing better than the human hand/arm that can get this done in an almost perfect manner. Having the correct tools helps too, but only the feel of the sensitive fingers and a dutiful eye can produce a fiberglass buggy body straight enough to paint black.
Here are my favorite sanding block I use to get that contour just right. 9 inch long flat hard rubber block, shallow curve and tighter curve with rounded pointed edge. I use self adhesive 80 grit paper that sticks to these blocks to help hold in place.
So, the sanding with the flat block produces an exceptionally flat surface. As the body is sanded, the high spots are removed and the low stay filled with that thin layer of primer. Then do it again and again until the sanding produces no more shadows in the primer.
In this photo you can see the darker areas that are holes that have been filled. They are lower and eventually fill with the primer. Be careful to sand down to just the body color starts showing, and stop. No need to go further or you will start to loose the original shape of the body.
Do not block or machine sand across a curve. The curve radius will be lost and flat spots will show up on it. In this photo the original curve can be seen. Only sand these with either a soft foam block, (which I prefer) or a bare hand.
Once the body has taken the perfect shape with the 80 grit sanding, one final light coat of Slick Sand is applied. Then the progressive finer sanding takes place to prep for paint. I start out with 100 grit to knock down any orange peel texture in the primer. Then switch to wet sanding. First step is 220 grit, then 320 and for final body prep, 400 grit. Then I use a good new hand mit and wash the body with either Dawn or Joy dish soap. This final wash will cut off any residual grease or skin oil from your hands, and any sanding dust. I spray with a hose the entire body, top and bottom so no dust remains on it to blow back into your paint.
Then paint. Since I cannot really paint anyway, I just spray it on without a paint booth. I have tried a paint booth and end up with the same results, so why waste the time making one?
Now that the body has been sprayed, it is set aside to cure for a few weeks and the chassis turns to the center of attention.
So, the topic at hand is sand. Sand, sand, sand, sand. Not the OBX Beach sand either, but the kind that gives one the warm, knowing you did something nice, hot feeling warmth you get in your wrists, elbows, and shoulders. Good old block sanding.
Now that the body work is knocked out in rough fashion, is is time to smooth it out. About 1/3 gallon of Polyester Slick Sand is sprayed on, sanded off, another 1/3 gallon sprayed on, and sanded off, then another 1/3 gallon sprayed on and sanded off. Sounds like corporal punishment. But, what happens is the body starts to take a very, very straight shape.
Being lazy, I have tried every mechanical means to get this done easier and quicker, but in 30+ years, I have found nothing better than the human hand/arm that can get this done in an almost perfect manner. Having the correct tools helps too, but only the feel of the sensitive fingers and a dutiful eye can produce a fiberglass buggy body straight enough to paint black.
Here are my favorite sanding block I use to get that contour just right. 9 inch long flat hard rubber block, shallow curve and tighter curve with rounded pointed edge. I use self adhesive 80 grit paper that sticks to these blocks to help hold in place.
So, the sanding with the flat block produces an exceptionally flat surface. As the body is sanded, the high spots are removed and the low stay filled with that thin layer of primer. Then do it again and again until the sanding produces no more shadows in the primer.
In this photo you can see the darker areas that are holes that have been filled. They are lower and eventually fill with the primer. Be careful to sand down to just the body color starts showing, and stop. No need to go further or you will start to loose the original shape of the body.
Do not block or machine sand across a curve. The curve radius will be lost and flat spots will show up on it. In this photo the original curve can be seen. Only sand these with either a soft foam block, (which I prefer) or a bare hand.
Once the body has taken the perfect shape with the 80 grit sanding, one final light coat of Slick Sand is applied. Then the progressive finer sanding takes place to prep for paint. I start out with 100 grit to knock down any orange peel texture in the primer. Then switch to wet sanding. First step is 220 grit, then 320 and for final body prep, 400 grit. Then I use a good new hand mit and wash the body with either Dawn or Joy dish soap. This final wash will cut off any residual grease or skin oil from your hands, and any sanding dust. I spray with a hose the entire body, top and bottom so no dust remains on it to blow back into your paint.
Then paint. Since I cannot really paint anyway, I just spray it on without a paint booth. I have tried a paint booth and end up with the same results, so why waste the time making one?
Now that the body has been sprayed, it is set aside to cure for a few weeks and the chassis turns to the center of attention.
- joescoolcustoms
- Posts: 286
- Joined: Mon Jun 03, 2013 5:00 am
- Location: Saint Albans, WV
Re: Roy's Ecotec Manx I build completion
Right before painting, I did finish up a few small items. One is with a 3 inch body lift, the steering column stays in the same place as the body goes up. So, instead of the column that goes through a hole in the dash, it can now be in a "U" shaped cut out, stay in place while the dash/hood is removed.
The dash brace was also customized for a better fit. This allows for the hood and dash to be removed from around it leaving the steering column in place.
So, to secure the hood/dash and windshield, a special bracket for each side was made. The windshield will bolt through them and them, and then through one bolt of the steering column brace.
Each part is hand fit before paint to ensure a nice final build. And each part labeled so as not to mix up and hunt later.
- joescoolcustoms
- Posts: 286
- Joined: Mon Jun 03, 2013 5:00 am
- Location: Saint Albans, WV
Re: Roy's Ecotec Manx I build completion
A few additions were added to the chassis to make it nicer, seal up, and be stronger with that big engine in the rear.
Then the chassis is stripped of all parts, put on the "poor man's rotisserie" so that final underneath welding can be performed.
Once all fabrication is complete, the entire chassis is blasted to white metal.
The bare chassis is then painted with a Catalyzed Epoxy Chassis Shield.
As the chassis paint is curing, automotive seam sealer is applied. This will help keep water out of any overlapping areas like the pan to tunnel area.
Then just as the paint and sealer is about to cure, (can just leave a fingerprint in the paint), activated Bed Liner is sprayed over the entire chassis.
When the chassis was media blasted, the other bit parts were blasted too. So, they too were prepped, sprayed with the Chassis shield, then top coated with Gloss Black. Including the steering column and turn signal.
Not to leave the hood out of the mix, it too was painted, just a few days later.
- joescoolcustoms
- Posts: 286
- Joined: Mon Jun 03, 2013 5:00 am
- Location: Saint Albans, WV
Re: Roy's Ecotec Manx I build completion
While the chassis was apart, Roy asked for some Chain hook points for use when flat towing with a tow bar. I started with 1/2" round solid bar. Welded the end to a scrap piece of roll cage tubing. Mounted it in a vice, heated the round stock red hot and wrapped it around the tubing in a spiral.
Cut length wise along the tubing making round loops.
Then bent the ends together to make a perfect circle, and welded them to the beam and the bumper mount.
Back to the chassis and put it together for the last time.
Because the throttle tube was removed with the thought of going "Drive by Wire" with the Ecotec, I had to go a different route for a throttle. Used a Morse Cable and it worked out slick.
Since the rear bumper is a little more heavy than normal, I padded my creaper and it made a nice installer's helper.
And the finished rolling chassis.
- joescoolcustoms
- Posts: 286
- Joined: Mon Jun 03, 2013 5:00 am
- Location: Saint Albans, WV
Re: Roy's Ecotec Manx I build completion
I was very disappointed with how the paint turned out. I sanded it, buffed and polished it, and it was not as a wished. So, back to scratch. I sanded it yet again with 400 grit and short another 6 coats on the body. Let cure.
Then started with 1000 grit sandpaper and wet sanded the body. Then 1500 grit, then 2000 grit, then 3000 grit. Then started buffing the body.
The extra effort was worth it.
Back to sanding, again. I sanded the inside of the tub with 80 grit sand paper. Then taped off 3/4 inch below the body line.
Then taped and papered over the painted part of the body.
I also sanded the entire underneath of the body. With 80 grit paper to knock off all the dirt, overspray and other coatings that have been applied over the years by different PO's. It also gives a very good texture for Bed Liner to grip and bond too. Then sprayed the underneath with black bed liner.
And then sprayed the inside with Bed Liner tinted with the same paint as was used on the body. You can see the splatter the tape and paper saved from the painted surface.
Roy stopped by and picked up the chassis and delivered it to a guy in Kentucky to flash the computer, prep the Ecotec and fire it up. In about a week, I will go get it and then put the body on for the final time, and push to complete the rest in a few weeks.
Re: Roy's Ecotec Manx I build completion
Awesome as usual Joe!
Mike Dario
Mohave Valley, AZ
Manx Club #957
Manx Club President
Tow'd (Hers)
Manxvair (His)
Manxter Dual Sport #30 Baja Edition #2 (Ours)
Resorter #19-Fuscia(under construction)
Mohave Valley, AZ
Manx Club #957
Manx Club President
Tow'd (Hers)
Manxvair (His)
Manxter Dual Sport #30 Baja Edition #2 (Ours)
Resorter #19-Fuscia(under construction)
Re: Roy's Ecotec Manx I build completion
Really great build thread. Lots of good how too's. I enjoyed following along.
- joescoolcustoms
- Posts: 286
- Joined: Mon Jun 03, 2013 5:00 am
- Location: Saint Albans, WV
Re: Roy's Ecotec Manx I build completion
Thank you for the kind words guys.
I am going to hit the hood hard tomorrow and see if I can get it knocked out.
Re: Roy's Ecotec Manx I build completion
Wow! Can't wait to see it finished!!
(Loretta) Manx # M2940D910E on customized 1970 chassis that has been "Wheelerized" by Joescoolcustoms
(Scarlett) Manx Resorter #12 (R0012B931S) on 1969 chassis.
(Gunther) Manx 2 # A0202A035E
Tow'dster # TF530G913S
Original Home built buggy that I learned to drive in back in 1995 (the one that started my passion).
Club Member # 4436
Loretta: http://www.manxclub.com/forum/viewtopic ... t=3365Manx" onclick="window.open(this.href);return false;
(Scarlett) Manx Resorter #12 (R0012B931S) on 1969 chassis.
(Gunther) Manx 2 # A0202A035E
Tow'dster # TF530G913S
Original Home built buggy that I learned to drive in back in 1995 (the one that started my passion).
Club Member # 4436
Loretta: http://www.manxclub.com/forum/viewtopic ... t=3365Manx" onclick="window.open(this.href);return false;
Re: Roy's Ecotec Manx I build completion
amazing work that you do mr wheeler!!!!