#33 going in the shop (advice)
-
Siggymanx33
- Posts: 353
- Joined: Thu Apr 22, 2010 5:00 am
#33 going in the shop (advice)
It's getting cold here on the East Coast and #33 is going into the shop in mid-December to get the engine rebuilt due to my initial mechanic selection and an engine that will not stop leaking (not VW drips, more like 5 constant leaks) ....nor hold oil pressure. With regards to the work, I am getting a new case and possibly replacing anything else that could be contributing to the oil pressure problem. I am looking to do a few upgrades as well. With regards to full flowing and adding a filter, does anyone know of a filter mount that works with the manx exaust. (exaust stud mount) And does anyone recomend a specific full flow pump? Anything else I need besides a pump, filter mount, filter mount bracket, and braided line?) Is this worth the expense? I also want to add a breather box for my valve covers and oil fill tube? Any recomendations and is this worth it as well? My first attempt at this a year ago, I replaced the heads (040), cam, oil pump, bearings, alternator, Kadrons. The engine is an 1835. Anything else that I should look at having replaced or should I trust that my new mechanic knows more than my previous one? He did mention that he can't really tell me until he cracks her open and he has been great with the jobs picking up the pieces from the previous clowns. I would really like to get it right this time........ And I am picking up a majority of the parts before the cars go in? As always, suggestions would be apprciated.
I use the aluminum BugPack "Super pump" on all the engines I build. It is a quality piece. I like the fact that it is all aluminum and expands with the case. It also has a pinned and "O" ringed cover plate on it. The fact that you don't have a breather setup on the engine, might very well be causing your oil leak problems. Excess crankcase pressure will push oil out of all kinds of places. If you can get an American made oil filter adapter you will be money and time ahead. The junk that Bugpack and EMPI are selling right now have the threads cast in the adapter and they won't seal around the fittings unless you run a tap thru all the threads before you assemble it. If you are having oil pressure problems and don't replace the case, you may want to have the oil pressure relief valve seats remachined, it makes a big difference in used cases.
-
Siggymanx33
- Posts: 353
- Joined: Thu Apr 22, 2010 5:00 am
If you're going to the trouble of rebuilding the engine, why not full flow the case? That means putting a pump with a cover that allows you to run a separate filter...not a filter pump (full flowing allows better flow than the filter pump.) And that way you can mount the filter wherever you'd like (plus add a cooler if needed.) Now here's my leak story. I had a nagging leak fron the front of the engine...flywheel seal right? Wrong. Changed it 3 times and still leaked. Maybe the cam plug? Nope. Turns out when the block was machined and they tapped the lower engine to trans mount stud holes, they tapped right into the sump! And then didn't put any sealant on the threads to boot. Finally got that sealed and I actually have NO leaks !!! 
GregR
#376
#376
-
Siggymanx33
- Posts: 353
- Joined: Thu Apr 22, 2010 5:00 am
-
allen pierce
- Posts: 228
- Joined: Mon Mar 14, 2005 9:00 pm
Here's a pic of my newly rebuilt engine (when I was almost done). 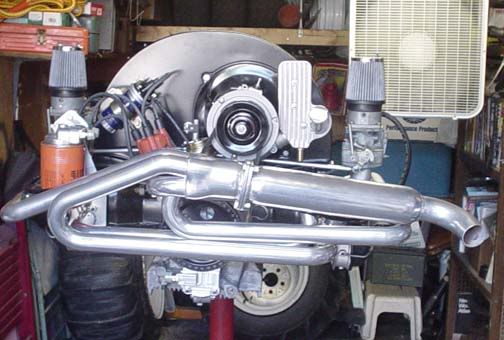 I like the oil breather box/oil filler hole combination unit because it puts the oil filler opening facing back, instead of off to the right side. I believe that it is easier to add oil, without spilling. And, it's a nice combo unit. - - - - - - - - - - - - - - - - - - - - - - - - - - Pete Grandia makes a nice oil filter bracket (that he sells, reasonably priced) that will work with the Sidewinder exhaust and mounts to the #4 exhaust studs. He has this one, that I call the "LEFT side mount", holds a short oil filter, but requires removal of the carb heat exchanger attachment flange. Send me an email and I'll reply with his email address, if you don't have it or he doesn't see this post.
 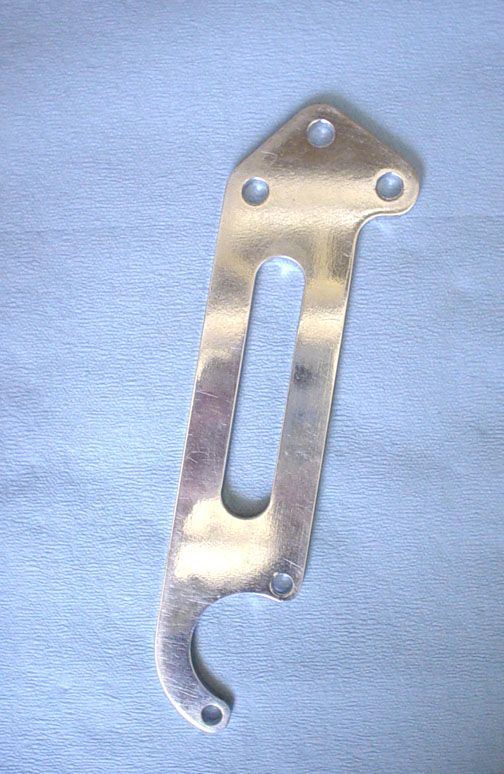 I asked him to make me one that I call the "RIGHT side mount" (no pic, sorry), that mounts to the #4 exhaust studs, holds a short oil filter and does not modify the carb heat exchanger attachment flange. I didn't want to mess with the hot jet coating. I later decided I wanted a taller oil filter (it's shown in the engine pic above, yeah, that's an HP-1, and I've read the other posts) and needed the filter to be a little more away from the distributator, so, I made a bracket (not as nice as Pete's), but, to the dimensions I wanted. As I don't have a machine shop, I did mine with my Mexineering techniques (Jig saw for rough shape, flat file to clean it up, drill for making exhaust stud holes and an orbital sander for the final surface finish - it took a couple of hours to do). If you'd like, I can make a copy of the drawing I used for the shape of my oil fiter bracket and I can send it to you (I'll need your address - email it to me). I'll take some pics a little later today to show how I did the location of the breather hose, the breather filter location on top of the breather box/oil filler (not shown above) and how the hose attaches to the front side of the valve covers. The engine pic above shows a fitting on the bottom of the breather/filler unit, I changed that, so when filling, the oil does not go into the breather hose. The breather/filler unit has plenty of holes to choose from.
I like the oil breather box/oil filler hole combination unit because it puts the oil filler opening facing back, instead of off to the right side. I believe that it is easier to add oil, without spilling. And, it's a nice combo unit. - - - - - - - - - - - - - - - - - - - - - - - - - - Pete Grandia makes a nice oil filter bracket (that he sells, reasonably priced) that will work with the Sidewinder exhaust and mounts to the #4 exhaust studs. He has this one, that I call the "LEFT side mount", holds a short oil filter, but requires removal of the carb heat exchanger attachment flange. Send me an email and I'll reply with his email address, if you don't have it or he doesn't see this post. I asked him to make me one that I call the "RIGHT side mount" (no pic, sorry), that mounts to the #4 exhaust studs, holds a short oil filter and does not modify the carb heat exchanger attachment flange. I didn't want to mess with the hot jet coating. I later decided I wanted a taller oil filter (it's shown in the engine pic above, yeah, that's an HP-1, and I've read the other posts) and needed the filter to be a little more away from the distributator, so, I made a bracket (not as nice as Pete's), but, to the dimensions I wanted. As I don't have a machine shop, I did mine with my Mexineering techniques (Jig saw for rough shape, flat file to clean it up, drill for making exhaust stud holes and an orbital sander for the final surface finish - it took a couple of hours to do). If you'd like, I can make a copy of the drawing I used for the shape of my oil fiter bracket and I can send it to you (I'll need your address - email it to me). I'll take some pics a little later today to show how I did the location of the breather hose, the breather filter location on top of the breather box/oil filler (not shown above) and how the hose attaches to the front side of the valve covers. The engine pic above shows a fitting on the bottom of the breather/filler unit, I changed that, so when filling, the oil does not go into the breather hose. The breather/filler unit has plenty of holes to choose from.-
Siggymanx33
- Posts: 353
- Joined: Thu Apr 22, 2010 5:00 am
-
5150bossman

- Posts: 607
- Joined: Thu Apr 01, 2010 5:00 am
- Location: So Cal
There are set-ups where the oil filter bolts right to the oil pump and requires no external plumbing that some call full flow. Stay away from these as they aren't truely full flow. I've seen I believe a Gene Berg or Bernnie Bergman set up where the filter is attached to the sump with no external plumbing. Don't know anything about it though. There is also a sump screen replacement that is an oil filter that fits inside the sump. Don't know how well that one works either. So far as a mounting location, I would avoid mounting the oil filter to an exhaust flange, as that will transfer a large amount of heat back into the oil. If you must attach it there, the mount pictured in Allen's post would work best, as it moves the filter far enough away from the direct radiant heat, so you only have to deal with the heat transfered down the mount from the flang. The other aftermarket mounts are very short. :2cents:
-
Siggymanx33
- Posts: 353
- Joined: Thu Apr 22, 2010 5:00 am
-
allen pierce
- Posts: 228
- Joined: Mon Mar 14, 2005 9:00 pm
Dave, Yes the hoses do go into the breather box. Here's a pic... 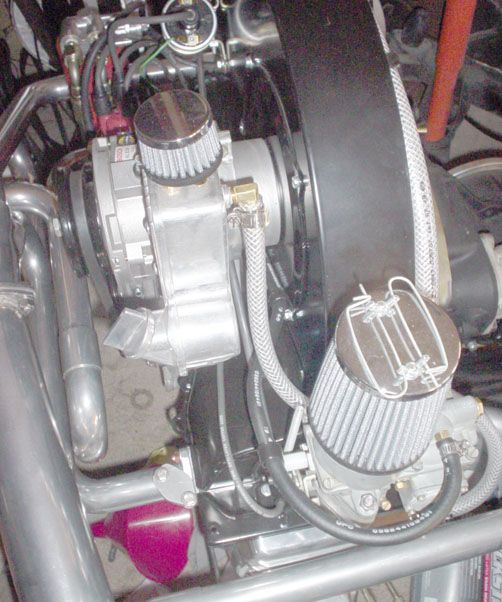 Small breather air filter on top, single hose out the back. It "Tee's" over behind the right side carb. I routed the hose to the left side valve cover on the front side of the fan shroud, as I wanted to keep the carb linkage and fuel hose lines as unobstructed as possible on the back side of the fan shroud. I also wanted to have the breather hose approach the valve cover from "up high" as I'd like it to stay away from the exhaust pipes. It's anchored pretty securely. Here's another angle of the oil filter bracket, with filter and hoses mounted (not touching each other).
 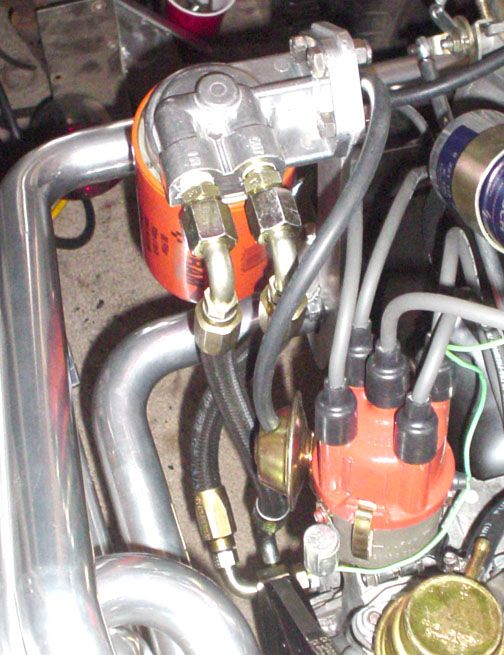 I can't address the issue of heat on the bracket, as I haven't started it up yet. But, I believe aluminium has a pretty good property of disapating heat quickly. And, you could put some of that heat resistant insulator material between the oil filter holder and the bracket, if it needed it.
Small breather air filter on top, single hose out the back. It "Tee's" over behind the right side carb. I routed the hose to the left side valve cover on the front side of the fan shroud, as I wanted to keep the carb linkage and fuel hose lines as unobstructed as possible on the back side of the fan shroud. I also wanted to have the breather hose approach the valve cover from "up high" as I'd like it to stay away from the exhaust pipes. It's anchored pretty securely. Here's another angle of the oil filter bracket, with filter and hoses mounted (not touching each other). I can't address the issue of heat on the bracket, as I haven't started it up yet. But, I believe aluminium has a pretty good property of disapating heat quickly. And, you could put some of that heat resistant insulator material between the oil filter holder and the bracket, if it needed it.Allen, You may have to utilize this little trick to keep oil vapor from exiting thru the filter on top of your breather. 
 I stuffed the breather with copper scouring pad (it's a mesh not like steel wool so it won't shed little particles) The scouring pad allows the oil in the vapor ot collect on it and drip back to the bottom of the housing. I have 2 seasons on it and it seems to work real well. I also have the bottom hose from the breather running to the fuel pump block off plate to drain the breather. I also had to machine the face of the breather housing flat because It was not sealing against the "O"ring in the lid.
I stuffed the breather with copper scouring pad (it's a mesh not like steel wool so it won't shed little particles) The scouring pad allows the oil in the vapor ot collect on it and drip back to the bottom of the housing. I have 2 seasons on it and it seems to work real well. I also have the bottom hose from the breather running to the fuel pump block off plate to drain the breather. I also had to machine the face of the breather housing flat because It was not sealing against the "O"ring in the lid.