hey what's your plans for meeting up with Paul and John.. I'd be interested in meeting up with everyone as well if possible.rzeller wrote:Joe is correct, I'm hugging the east coast up to my hometown in NY. Then meeting up with at least two others, Farmer John and Paul, to complete the trip to the falls. Coincidentally, it IS 1000 milesjoescoolcustoms wrote:He has been the "Bud" of many jokes, and has been very good about it. If I get to make Buffalo, I want to be the first to shake his hand once he gets his Long Haul Pin.
I am thinking Bud and Sue will be running up the coast from Wilmington into NY, then turn West to Buffalo. That will stretch it out and make the 1000 mile one-way mark.I think it will also include some very sweet sight seeing, a run with Farmer John and Paul on a curvy trail through some mountains.
Bud's Manx Restoration
-
73SpeedBuggy
- Posts: 184
- Joined: Tue Mar 30, 2010 5:00 am
Re: Bud's Manx Restoration

Re: Bud's Manx Restoration
I don't want to hijack Vince's thread (especially since it's about my buggy73SpeedBuggy wrote:hey what's your plans for meeting up with Paul and John.. I'd be interested in meeting up with everyone as well if possible.rzeller wrote:Joe is correct, I'm hugging the east coast up to my hometown in NY. Then meeting up with at least two others, Farmer John and Paul, to complete the trip to the falls. Coincidentally, it IS 1000 milesjoescoolcustoms wrote:He has been the "Bud" of many jokes, and has been very good about it. If I get to make Buffalo, I want to be the first to shake his hand once he gets his Long Haul Pin.
I am thinking Bud and Sue will be running up the coast from Wilmington into NY, then turn West to Buffalo. That will stretch it out and make the 1000 mile one-way mark.
I've created a new thread for my trip from Wilmington, NC to Manx Over The Falls in Buffalo, NY. If you are interested in joining along the route let me know. Have a look:
http://www.manxclub.com/forum/viewtopic.php?f=75&t=3393
Bud Zeller
Wilmington, NC
Manx Club Member Since 2004 - #2475
Member of the Manx Club's Long Haul League - 2015
2018 NORRA Mexican 1000 - #1356 - Bad News Racing
2022 NORRA Mexican 1000 - #3347 - Bad News Racing & ACME Companies
2023 NORRA Mexican 1000 - #1356 - Bad News Racing
'68 Meyers Manx - M1996F826S
'66 VW Kombi Bus
'73 VW Thing

Re: Bud's Manx Restoration
Any more updates on the progress? Love to follow the progress.
(Loretta) Manx # M2940D910E on customized 1970 chassis that has been "Wheelerized" by Joescoolcustoms
(Scarlett) Manx Resorter #12 (R0012B931S) on 1969 chassis.
(Gunther) Manx 2 # A0202A035E
Tow'dster # TF530G913S
Original Home built buggy that I learned to drive in back in 1995 (the one that started my passion).
Club Member # 4436
Loretta: http://www.manxclub.com/forum/viewtopic ... t=3365Manx" onclick="window.open(this.href);return false;

Re: Bud's Manx Restoration
Update 1/29/15
Not any flashy (sparkly) updates but progress made on the chassis.
Bud has had problems with breaking clutch cables in the past so I looked into it and found that the clutch and accelerator tubes were welded to the bottom area of the chassis where they exit and their positions were switched. This put a "bind" on both clutch and accelerator cables causing undue wear on the clutch cable and not allowing the accelerator cable to move smoothly. This caused the linkage to stay open longer when the pedal was released.
Here is the repair:
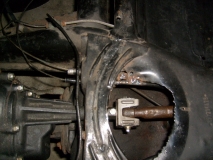
You can see that the tubes were moved up to their proper locations. (not the prettiest welds, not up to Joe W. skills yet, but quite solid)
Speaking of Joe W. I have found that dune buggy people as a whole are just AWESOME and willing to pitch it any way they can. Joe goes well beyond that. His posts are well written, pictures are well lit and what you need to see, and his skills are fantastic. Most of all he is willing to take the time to share them in a way that anyone can understand. (maybe not replicate, but endeavor to try) He is also a really nice guy who will answer his phone and walk you through a process.
Which brings me to my next picture. I installed beam adjusters:
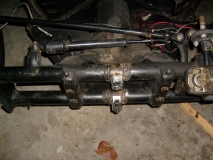
I have "turned" beam anchors before and installed adjusters as well. I have done both by "feel" and have had to redo them on occasion. I figured this time I would call Joe (the expert IMHO) and see what he could recommend. (yes I read the instructions but I do better if I can visualize it) Joe helped me out and it made me feel more confident and much better about the process. (Joe also helped out with a solution to a broken clutch tube)
I did vary it a bit by putting less "pre load" on the upper tube to help give it a softer ride.
Thanks Joe!
Vince
Not any flashy (sparkly) updates but progress made on the chassis.
Bud has had problems with breaking clutch cables in the past so I looked into it and found that the clutch and accelerator tubes were welded to the bottom area of the chassis where they exit and their positions were switched. This put a "bind" on both clutch and accelerator cables causing undue wear on the clutch cable and not allowing the accelerator cable to move smoothly. This caused the linkage to stay open longer when the pedal was released.
Here is the repair:
You can see that the tubes were moved up to their proper locations. (not the prettiest welds, not up to Joe W. skills yet, but quite solid)
Speaking of Joe W. I have found that dune buggy people as a whole are just AWESOME and willing to pitch it any way they can. Joe goes well beyond that. His posts are well written, pictures are well lit and what you need to see, and his skills are fantastic. Most of all he is willing to take the time to share them in a way that anyone can understand. (maybe not replicate, but endeavor to try) He is also a really nice guy who will answer his phone and walk you through a process.
Which brings me to my next picture. I installed beam adjusters:
I have "turned" beam anchors before and installed adjusters as well. I have done both by "feel" and have had to redo them on occasion. I figured this time I would call Joe (the expert IMHO) and see what he could recommend. (yes I read the instructions but I do better if I can visualize it) Joe helped me out and it made me feel more confident and much better about the process. (Joe also helped out with a solution to a broken clutch tube)
I did vary it a bit by putting less "pre load" on the upper tube to help give it a softer ride.
Thanks Joe!
Vince
-
joescoolcustoms

- Posts: 286
- Joined: Mon Jun 03, 2013 5:00 am
- Location: Saint Albans, WV
Re: Bud's Manx Restoration
Thanks for the mention Vince! I just have broken, twisted, shattered, stripped and screwed up more stuff than most, so I have intimate knowledge of how to fix most ruined crap. Which, makes me not afraid to ruin more in the learning curve. The old "Jack of all, but master of none".
BTW, Bud will not know how to act once he gets all this back together. Softer chassis, working clutch, new bigger engine, flashy top coat. Mrs. Sue is getting a new Carriage.
BTW, Bud will not know how to act once he gets all this back together. Softer chassis, working clutch, new bigger engine, flashy top coat. Mrs. Sue is getting a new Carriage.
Re: Bud's Manx Restoration
You are welcome Joe. I have to say that you and I went to the same school when it comes to the learning curve.
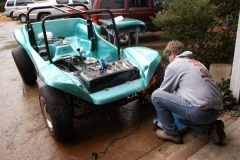
Update 2/9.
I , with the help of Paul M., bedlinered the top and bottom of the chassis on Saturday.
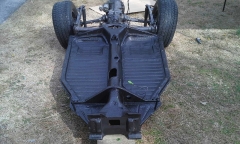
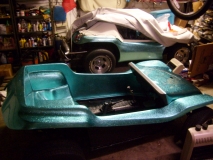
Today I had the help of Scott J. to clean up and place the body on the chassis for some shots that show the rims/tires.
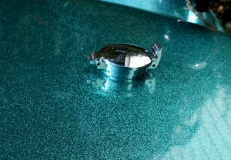
I also installed the shifter, castor shims, brake MC, pedal cluster, glassed the dash to the hood, cut the hole for new filler cap and moved the filler location on the fuel tank. (I really need to get a new camera, I am afraid to use my phone because I know that I will get resin or paint on it)
Vince
Update 2/9.
I , with the help of Paul M., bedlinered the top and bottom of the chassis on Saturday.
Today I had the help of Scott J. to clean up and place the body on the chassis for some shots that show the rims/tires.
I also installed the shifter, castor shims, brake MC, pedal cluster, glassed the dash to the hood, cut the hole for new filler cap and moved the filler location on the fuel tank. (I really need to get a new camera, I am afraid to use my phone because I know that I will get resin or paint on it)
Vince

Re: Bud's Manx Restoration
Beautiful!
Mike Dario
Mohave Valley, AZ
Manx Club #957
Manx Club President
Tow'd (Hers)
Manxvair (His)
Manxter Dual Sport #30 Baja Edition #2 (Ours)
Resorter #19-Fuscia(under construction)
Mohave Valley, AZ
Manx Club #957
Manx Club President
Tow'd (Hers)
Manxvair (His)
Manxter Dual Sport #30 Baja Edition #2 (Ours)
Resorter #19-Fuscia(under construction)
Re: Bud's Manx Restoration
Thanks Mike
Color is close.
Color is close.
-
joescoolcustoms
- Posts: 286
- Joined: Mon Jun 03, 2013 5:00 am
- Location: Saint Albans, WV
Re: Bud's Manx Restoration
Wow! I look forward to seeing that in person. After Bud get's this back, and done, and his Lang Haul Pin, he will not be able to stop smiling for a few years. Very nice work!
Re: Bud's Manx Restoration
Vince,
Did you spray the awlgrip on the inside of the body and buff/polish that out?
Chris
Did you spray the awlgrip on the inside of the body and buff/polish that out?
Chris
Re: Bud's Manx Restoration
Joe
Thanks for the kind words. I hope Bud is smiling for a long time.
Chris,
I sprayed the inside with the Awl Craft 2000 but did not polish it out. It is glossy but will not show the scratches that a polished surface would.
Update 2/17
Made some progress.
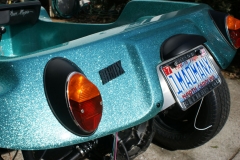
Installed tail lights and license plate setup:
Installed front bumper:
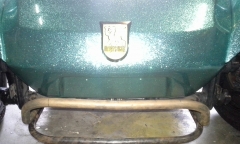
Re plumbed and bled brakes, wired front end:

Started wiring process:
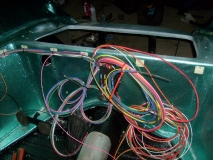
Using a Rebel Wiring harness, Deluxe Bug.
Installed tank:
Will work more on wiring tomorrow.
Vince
Thanks for the kind words. I hope Bud is smiling for a long time.
Chris,
I sprayed the inside with the Awl Craft 2000 but did not polish it out. It is glossy but will not show the scratches that a polished surface would.
Update 2/17
Made some progress.
Installed tail lights and license plate setup:
Installed front bumper:
Re plumbed and bled brakes, wired front end:
Started wiring process:
Using a Rebel Wiring harness, Deluxe Bug.
Installed tank:
Will work more on wiring tomorrow.
Vince
Re: Bud's Manx Restoration
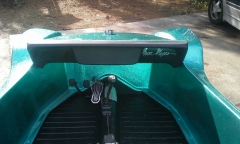
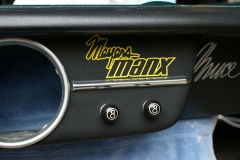
After 3.5 months of not seeing our buggy I finally got to spend some quality time with it (and Vince  ) this past weekend. Vince asked me to work on the dash layout so that it would be exactly like I wanted. So before we went a cuttin' on that award winning dash....
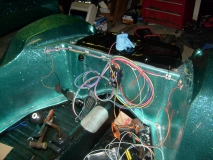
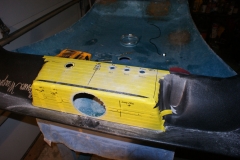
... I started with the area(s) being covered in tape.
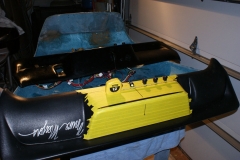
I plan to have 3 toggle switches (with a little LED), a large LED that will be used to light up the floorboard area (great idea Paul), and an auxiliary power plug all semi-hidden and positioned on the bottom side of the dash. The face of the dash will be very minimalist with the '68-only speedo/gas gauge, wiper switch, headlight switch, ignition switch, and a little homage to the VW - some dash board moulding. Important tip: measure, measure, measure and mock it up before cutting or drilling (did have one little hole mis-marked and drilled). Fortunately the moulding covers it.
Here's close to what the finished product will look like. The speedo has to be added and the ignition switch (will go where the little white dot is in the lower left corner). I didn't have the switch so no drillo.

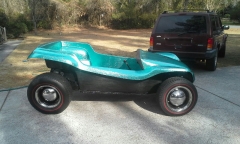
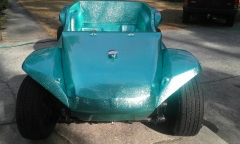
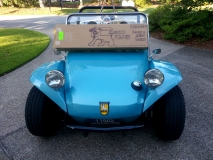
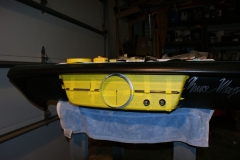
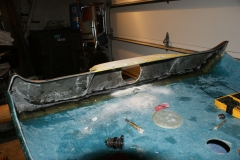
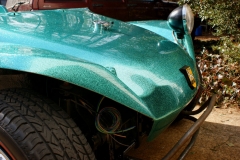
Here are a few more miscellaneous pictures of the fantastic work Vince is doing on our buggy. I want to thank him publicly for treating it with care and high degree/quality workmanship. It's been said before, but the pictures don't do it justice. It sparkles like a box of gems.
Look at the reflection of the headlight bucket in the hood. The clear coat is VERY deep.
Here's the requisite butt shot:
... I started with the area(s) being covered in tape.
I plan to have 3 toggle switches (with a little LED), a large LED that will be used to light up the floorboard area (great idea Paul), and an auxiliary power plug all semi-hidden and positioned on the bottom side of the dash. The face of the dash will be very minimalist with the '68-only speedo/gas gauge, wiper switch, headlight switch, ignition switch, and a little homage to the VW - some dash board moulding. Important tip: measure, measure, measure and mock it up before cutting or drilling
Here's close to what the finished product will look like. The speedo has to be added and the ignition switch (will go where the little white dot is in the lower left corner). I didn't have the switch so no drillo.
Here are a few more miscellaneous pictures of the fantastic work Vince is doing on our buggy. I want to thank him publicly for treating it with care and high degree/quality workmanship. It's been said before, but the pictures don't do it justice. It sparkles like a box of gems.
Look at the reflection of the headlight bucket in the hood. The clear coat is VERY deep.
Here's the requisite butt shot:
Bud Zeller
Wilmington, NC
Manx Club Member Since 2004 - #2475
Member of the Manx Club's Long Haul League - 2015
2018 NORRA Mexican 1000 - #1356 - Bad News Racing
2022 NORRA Mexican 1000 - #3347 - Bad News Racing & ACME Companies
2023 NORRA Mexican 1000 - #1356 - Bad News Racing
'68 Meyers Manx - M1996F826S
'66 VW Kombi Bus
'73 VW Thing
Wilmington, NC
Manx Club Member Since 2004 - #2475
Member of the Manx Club's Long Haul League - 2015
2018 NORRA Mexican 1000 - #1356 - Bad News Racing
2022 NORRA Mexican 1000 - #3347 - Bad News Racing & ACME Companies
2023 NORRA Mexican 1000 - #1356 - Bad News Racing
'68 Meyers Manx - M1996F826S
'66 VW Kombi Bus
'73 VW Thing
Re: Bud's Manx Restoration
Looking Great! What windshield wiper assembly are you using? and how much clearance from the speedo is there?
Mike Dario
Mohave Valley, AZ
Manx Club #957
Manx Club President
Tow'd (Hers)
Manxvair (His)
Manxter Dual Sport #30 Baja Edition #2 (Ours)
Resorter #19-Fuscia(under construction)
Mohave Valley, AZ
Manx Club #957
Manx Club President
Tow'd (Hers)
Manxvair (His)
Manxter Dual Sport #30 Baja Edition #2 (Ours)
Resorter #19-Fuscia(under construction)
Re: Bud's Manx Restoration
Mike, it's a stock beetle ~68'ish assembly. It hasn't been mounted yet. We didn't get that far this weekend so I'll leave it to Vince to post pictures of that after he sets it up. We ran into a little problem with spacing between my front hoop and the dash. Vince is going to have to remove the dash and cut it down a little. Just a slight "gottcha", or at least that's what Vince tells memanxvair wrote:Looking Great! What windshield wiper assembly are you using? and how much clearance from the speedo is there?
Bud Zeller
Wilmington, NC
Manx Club Member Since 2004 - #2475
Member of the Manx Club's Long Haul League - 2015
2018 NORRA Mexican 1000 - #1356 - Bad News Racing
2022 NORRA Mexican 1000 - #3347 - Bad News Racing & ACME Companies
2023 NORRA Mexican 1000 - #1356 - Bad News Racing
'68 Meyers Manx - M1996F826S
'66 VW Kombi Bus
'73 VW Thing
Wilmington, NC
Manx Club Member Since 2004 - #2475
Member of the Manx Club's Long Haul League - 2015
2018 NORRA Mexican 1000 - #1356 - Bad News Racing
2022 NORRA Mexican 1000 - #3347 - Bad News Racing & ACME Companies
2023 NORRA Mexican 1000 - #1356 - Bad News Racing
'68 Meyers Manx - M1996F826S
'66 VW Kombi Bus
'73 VW Thing
-
joescoolcustoms
- Posts: 286
- Joined: Mon Jun 03, 2013 5:00 am
- Location: Saint Albans, WV
Re: Bud's Manx Restoration
Nice! A different, fresh approach.
Also, do I see a curved, copper Hurst?
Also, do I see a curved, copper Hurst?