Re: First Build thread of 2015 and of the new Forum - Lorett
Posted: Sat Apr 04, 2015 9:12 pm
Well David, you can have a discussion with Brian on that subject, but I will bet a nice sum on the outcome answer!
Sand Tech 101. These are not hard fast, only way to do it suggestions. The suggestions are based on reading about body work, asking questions, watching others that are good in what they do, listening and then the 75% of it is just basic "get-R-done" experience. Several people have helped educate me as well as screwing up about as much paint as humanly possible.
First, how to sand. The only time to use your bare hand and sand paper is in a tight corner or on very small parts. Otherwise, you will make a straight panel or surface wavey. Sanding much of any surface area needs to be done with some sort of back up to work toward the desired shape, or not loose the desired shape.
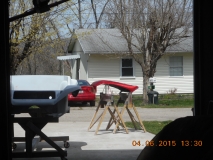
Several sanding forms are commercially available, and you can custom make some for specific shapes.
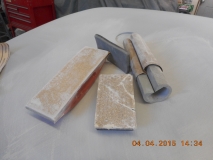

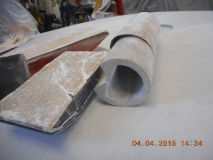
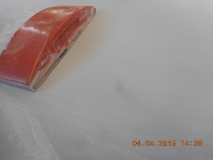
The larger the sanding block that you can use, that is close to the desired shape, the straighter the panel will turn out being. Above are a few of the blocks I use. 10 inch flat, 6 inch flat, 2 inch round and a soft(er) foam rubber block. The hard ones kind of explain them selves and typically I only use them for dry sanding. The black/grey foam rubber is good to use once you switch to wet sanding. The black side is harder than the grey side for use over several shaped surfaces.
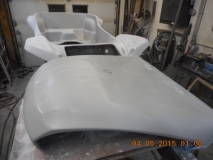
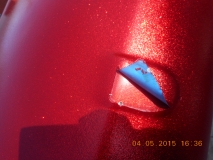
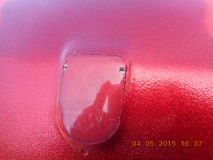
I start out sanding with 80 grit to prep a surface for good paint adhesion. I typically use a DA Sander (Dual Action), as seen in posts above to prep 90% of the body, quickly. Then focus on the "trouble" spots, spots that require body work including the fiberglass repairs seen elsewhere in this thread. Once I have those areas 90% knocked out, I prime those areas. Then spot work those areas. Once I get the trouble areas to 98% done, I move on to the entire body, and lay down several coats of primer over the entire surface. Then more sanding.
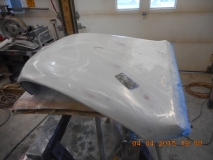
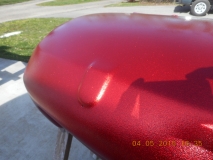
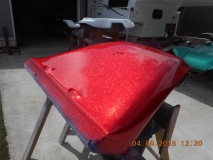
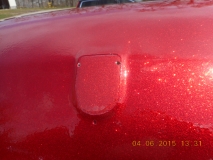
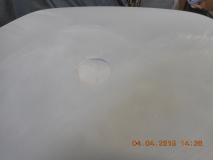
Here is where the "blocking the body" phrase comes from. Using the sanding blocks with 220 grit sand paper, sand the complete body, except for the edges. In these pictures you can see a little darker spot in the primer. It is a low or shallow spot on the body that the sandpaper is not touching as it is passed over.
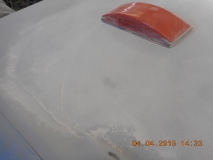
Since I already knew it was there, (in the area of the large hole that was hacked into the hood for a air scoop), I applied several coats of primer in that area anticipating what was needed to get rid of it. Keep sanding with that straight block and it will take the higher area down to that low spot, basically filling that shallow spot with primer.
That low shallow spot is now gone, and because of using a flat block, not my hand, that area is super flat and smooth. No waves will be seen once the final paint is applied.
Some of these photo's may be hard to see, and you can go to my Gallery, under "Loretta", click on the picture and it will enlarge to a point you may be able to see the area.
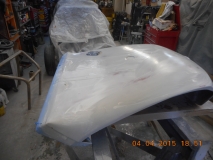
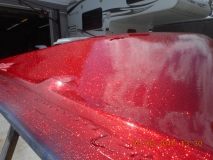
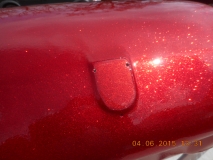
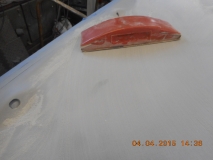
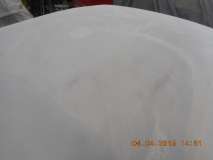
Next are some "orange peal" areas that can be seen as darker spots peppered about in the primer. This all needs to be sanded out or it will give a built up texture and show up under the clear as a rough area.
I sand in a cross hatch pattern in long as possible strokes to even out the highs/lows and not spot sand. Spot sanding will create shallow areas that also show up in waves in the final paint. Sanding one way until all the scratches are in one direction, then changing direction and sanding until all scratches run that direction is a really good way to remove high spots and get a very smooth straight surface. Lots of primer end up on the floor.

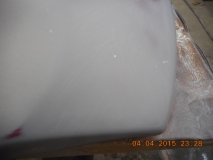
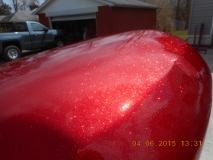
I sand the primer off until I can see hints of the original color showing up faintly, then stop. If I still have low spots, more primer is needed. If I have high spots that sanded through, then maybe you need to grind that high spot out/down and do again.
Always sand towards a edge, but not over the edge. You will wipe out that edge profile and crate a flat spot that will not be seen until the top coat of paint is applied, then it is too late. Leave the edge alone and come back to address it on your final wet sanding before shooting the base coat of color. If you wipe that original profile of the edge off, it is a PITA to re-establish.
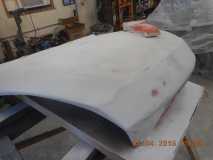
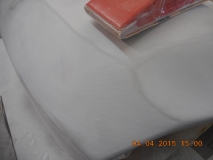
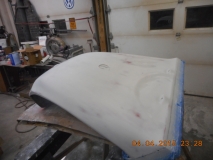
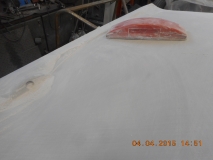
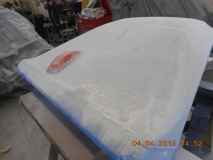
The flat areas were sanded with the flat 10 inch block, the con-caved area on the sides was sanded with the round block.
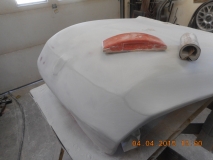
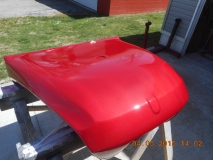
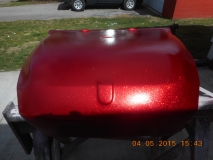
This hood, even with several large fiberglass repairs, is now very straight and flat. Now that my arms have rested, I will vacuum the dust and switch to sanding with the foam rubber block and wet 320 grit paper. At this point, all body work is done and now it is time to prep for the paint that will follow. The 320 grit wet sanding will only be used to remove the scratches of the 220 grit paper. If any areas pop through, I will spot prime those areas, let dry, then wet sand with 400 grit paper for the final time before laying the base coat on.
Sounds easy, right? It is. It just takes time. Time to let the coats fully cure before sanding, time to sand fully and not rush the job. If you set aside X amount of hours on a weekend to sand and paint a car, you are asking for mistakes or missed areas. Slow down and let the body show you it's hidden secrets. I have already found a bunch of small mold mistakes that are now gone. If I paint tomorrow, good. If I do not get far enough to paint tomorrow, good. When it is ready and I have a window of weather, energy left, it will get painted.
Sand Tech 101. These are not hard fast, only way to do it suggestions. The suggestions are based on reading about body work, asking questions, watching others that are good in what they do, listening and then the 75% of it is just basic "get-R-done" experience. Several people have helped educate me as well as screwing up about as much paint as humanly possible.
First, how to sand. The only time to use your bare hand and sand paper is in a tight corner or on very small parts. Otherwise, you will make a straight panel or surface wavey. Sanding much of any surface area needs to be done with some sort of back up to work toward the desired shape, or not loose the desired shape.
Several sanding forms are commercially available, and you can custom make some for specific shapes.
The larger the sanding block that you can use, that is close to the desired shape, the straighter the panel will turn out being. Above are a few of the blocks I use. 10 inch flat, 6 inch flat, 2 inch round and a soft(er) foam rubber block. The hard ones kind of explain them selves and typically I only use them for dry sanding. The black/grey foam rubber is good to use once you switch to wet sanding. The black side is harder than the grey side for use over several shaped surfaces.
I start out sanding with 80 grit to prep a surface for good paint adhesion. I typically use a DA Sander (Dual Action), as seen in posts above to prep 90% of the body, quickly. Then focus on the "trouble" spots, spots that require body work including the fiberglass repairs seen elsewhere in this thread. Once I have those areas 90% knocked out, I prime those areas. Then spot work those areas. Once I get the trouble areas to 98% done, I move on to the entire body, and lay down several coats of primer over the entire surface. Then more sanding.
Here is where the "blocking the body" phrase comes from. Using the sanding blocks with 220 grit sand paper, sand the complete body, except for the edges. In these pictures you can see a little darker spot in the primer. It is a low or shallow spot on the body that the sandpaper is not touching as it is passed over.
Since I already knew it was there, (in the area of the large hole that was hacked into the hood for a air scoop), I applied several coats of primer in that area anticipating what was needed to get rid of it. Keep sanding with that straight block and it will take the higher area down to that low spot, basically filling that shallow spot with primer.
That low shallow spot is now gone, and because of using a flat block, not my hand, that area is super flat and smooth. No waves will be seen once the final paint is applied.
Some of these photo's may be hard to see, and you can go to my Gallery, under "Loretta", click on the picture and it will enlarge to a point you may be able to see the area.
Next are some "orange peal" areas that can be seen as darker spots peppered about in the primer. This all needs to be sanded out or it will give a built up texture and show up under the clear as a rough area.
I sand in a cross hatch pattern in long as possible strokes to even out the highs/lows and not spot sand. Spot sanding will create shallow areas that also show up in waves in the final paint. Sanding one way until all the scratches are in one direction, then changing direction and sanding until all scratches run that direction is a really good way to remove high spots and get a very smooth straight surface. Lots of primer end up on the floor.
I sand the primer off until I can see hints of the original color showing up faintly, then stop. If I still have low spots, more primer is needed. If I have high spots that sanded through, then maybe you need to grind that high spot out/down and do again.
Always sand towards a edge, but not over the edge. You will wipe out that edge profile and crate a flat spot that will not be seen until the top coat of paint is applied, then it is too late. Leave the edge alone and come back to address it on your final wet sanding before shooting the base coat of color. If you wipe that original profile of the edge off, it is a PITA to re-establish.
The flat areas were sanded with the flat 10 inch block, the con-caved area on the sides was sanded with the round block.
This hood, even with several large fiberglass repairs, is now very straight and flat. Now that my arms have rested, I will vacuum the dust and switch to sanding with the foam rubber block and wet 320 grit paper. At this point, all body work is done and now it is time to prep for the paint that will follow. The 320 grit wet sanding will only be used to remove the scratches of the 220 grit paper. If any areas pop through, I will spot prime those areas, let dry, then wet sand with 400 grit paper for the final time before laying the base coat on.
Sounds easy, right? It is. It just takes time. Time to let the coats fully cure before sanding, time to sand fully and not rush the job. If you set aside X amount of hours on a weekend to sand and paint a car, you are asking for mistakes or missed areas. Slow down and let the body show you it's hidden secrets. I have already found a bunch of small mold mistakes that are now gone. If I paint tomorrow, good. If I do not get far enough to paint tomorrow, good. When it is ready and I have a window of weather, energy left, it will get painted.